The topic of microservices architecture has become increasingly popular over the last couple of years. The reason behind it lies in numerous advantages that the modular architectural style brings to the table, especially when it comes to designing complex applications.
The microservices architecture is a good fit for apps that need to process transactions quickly and handle high traffic volumes and large numbers of concurrent users. That’s why companies involved in SaaS development, be it an e-commerce platform, a social media app, a streaming service, or a food delivery app, rely on microservices to make their solutions scalable and resilient to failures.
We’ve already covered the pros and cons of implementing microservices architecture and compared microservices against monolithic architecture here.
This article was written for .NET developers and solution architects who want to improve their microservices-based application and find the right approach to implementing communication between microservices.
Can microservices be fully independent?
Microservices-based application architecture is designed to enable independent working of small parts of a big system. Each microservice is responsible for a specific function of the system, and each service can be related to a different data storage. For example, one service can store data in a Microsoft SQL database, and another can use NoSQL storage, like MongoDB, etc.
On the other hand, there are many cases when we can’t create totally independent parts. For example, we create Security microservice responsible for user security and authorization. We also need Communication microservice to keep track of messages, notifications, and other instances of interaction with the user. Both of these microservices depend on the same user base, yet they are independent in the type of user information they store, preserving only that data that is essential for their operation. In such a scenario, the main idea is to minimize the dependency of each service from another service. Sometimes we need to make some cross-service queries or even store some similar data in different places. At this point, we should provide an ability for microservices to communicate with each other.
Why do we need to build communication between the services?
As we’ve mentioned above, it can be really difficult to create a totally independent architecture because in some cases, your microservices need to communicate with each other. By the way, you may need communication even in the case when you are storing similar data in different storage. To provide examples, we will take one of our existing projects, where we had to implement interservice communication.
We have an application which consists of a list of microservices. For our example, we will take a look only at a few of them – authorization, analytics, orders, gateway, and email service. Each service has its own database to store data independently.
Let’s briefly examine the purpose of each microservice:
- Gateway. Distributes requests to other microservices based on their destination. Other microservices accept requests only from the gateway microservice. Gateway is the only microservice open for outside requests.
- Authorization. Provides main security features for the entire application – user login, logout, registration, password recovery, etc.
- Email. Provides the ability to send various email messages to users, such as reminders, newsletters, password recovery mails, etc.
- Orders. It is the microservice responsible for execution of all main order operations, such as creating, updating, deleting, viewing, calculating, pricing, tracking orders, and many more. This service contains all information about orders in the system, and it is the main data storage of the application
- Analytics. Provides some functionality to view statistics and analytics, such as the number of open orders in the system, how long they have been open, and other data necessary for effective decision making. This service may not store every detail of the order, yet it allows to quickly and conveniently access crucial data presented in a visually appealing format.
As you can see, each microservice is responsible for different operations and mostly doesn’t require the same data storage, because the data for each microservice is quite different. The exception is analytics microservice. It should have the same information about orders in the system. However, should we use the same data storage?
Why is it better to have different data storage for each microservice?
If you build microservices-based architecture for your application, you should take care of the scalability of your application. In the case of using the same data storage for different microservices, you will get into trouble with scalability. If one of your services is overloaded, it can affect data storage too. So you should scale more items to improve performance in one of your services. In this case, application instances are much bigger. Note, that the data placed in one storage can affect performance. Moreover, it may lead to a heavy load.
To avoid these problems, you can use different data storage for each microservice. Designing storage to suit the needs of an exact service can improve the performance of operations with data processing. Also, it can simplify development and work with data, because of storing data in the convenient, ready-to-use format and avoiding data converting.
Any changes to your microservice won’t create any hidden bugs in other microservices, because they are independent. If you use the same storage and make a decision to change some entity model, you won’t need to repeat these changes in every other service that uses the same data storage.
For our case with analytics and orders microservices, we have some additional details. The Orders service can change orders at any moment and it has a high load. The Analytics service should only calculate some data for charts and dashboards. There is no need to get all the changes immediately so that we can perform these operations by schedule (hourly, daily, etc.).
To sum up, we have to synchronize our data in these two services and recalculate it when data entities get modified. It can be resolved with the help of interservice communication using messaging queues. We used an Azure Service Bus message broker for this purpose.
What is Azure Service Bus?
Azure Service Bus is a fully managed enterprise integration message broker. Azure Service Bus can decouple applications and services and offers a reliable and secure platform for asynchronous transfer of data and state. The main idea is to send any data between the services using messages. These messages are in binary format and can contain JSON, XML, or even plain text.
The main features of Azure Service Bus are as follows:
- Sending messages using queues. The receiver should start listening to some special queue, and if any message is sent to this queue – the listener will receive it.There is no need to have both instances (sender and receiver) online at the same time. Messages are sent to the queue and are awaiting for any listener who wants to receive those messages.
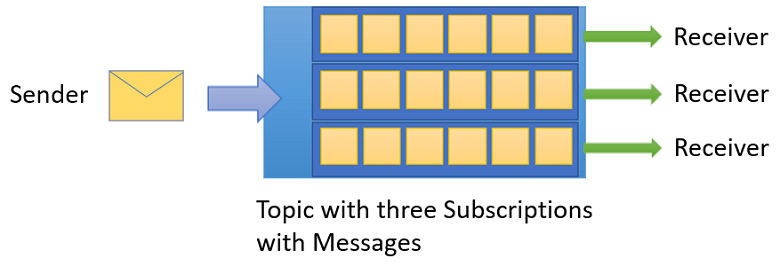
- Topics and subscriptions. You can create publishers and subscribers who are listening to some specific topics. So one publisher can share a message to different receivers (1:n relationship).
- Scheduling time. You can schedule a message to some specific time, and subscribers will receive it at a scheduled time.
Queues
All messages are sent to and received from the queues. You are just sending a message to the specific queue, and messages will wait for a receiver who will receive and process this message. By the end of message processing, the receiver should complete a message to remove it from the queue.

Also, you can configure your queue to complete your message on the first receive automatically. In this case, the message will be deleted as soon as the listener received it.
Topics
There is one more way to use messages, that is based on topics and subscriptions. You can configure some filters, lifetime, and even conditions to receive messages in different instances. In addition, different receivers can handle messages from one sender. A subscriber can receive a copy of each message sent to the topic, but messages can be expired or autodeleted.
We preferred to use queues because we have only one service (analytics) that should listen to any messages about orders updates.
Implementing Azure Service Bus
Azure Service Bus is really easy-to-use. We can implement this functionality in a few rows. But first, we need to go to the Azure portal and create a Service Bus resource.
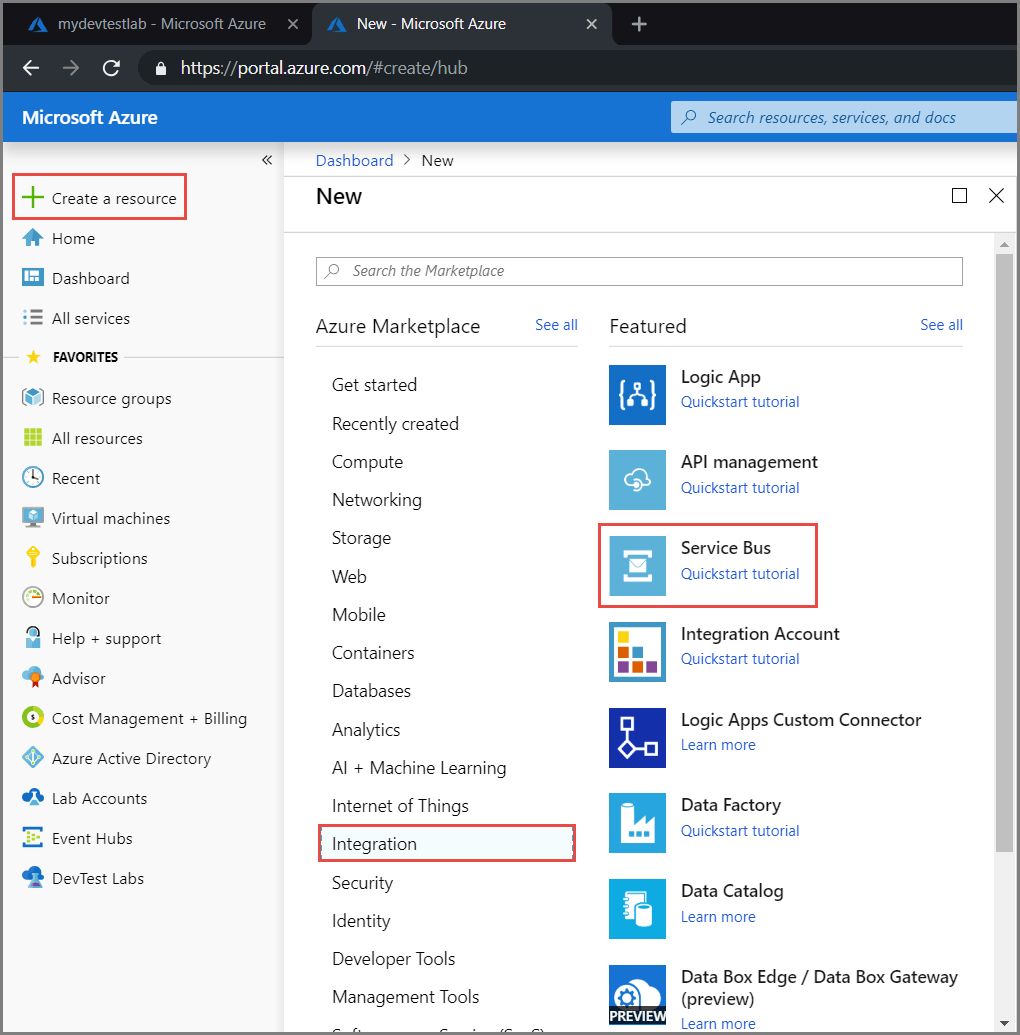
The next step is filling the main fields – name, resource group, location. If everything is successful, you will get notification about that, and you will be able to see your Service Bus namespace. To start working with Service Bus, we need to get a connection string. It can be done by clicking “Shared access policies”. You need to put this data into your application configuration file.
The next step is creating a Queue. It can be done on the Azure portal.

At this stage, you can configure your queue. You need to set the name of your queue, and you can go ahead without any special settings.
However, there are some important things you should know about configuration values:
- Message time to live. Shows how long your message will be able to be received and processed. If your message has expired, it goes to the Dead Letter queue.
- Lock duration. When a listener receives a message, he will have some time to process it. During this period, the message will be locked, and no one else will receive this message. If this time elapses – the message becomes available to be received by any instance that listens to this queue.
- Dead Letter queue. One more thing you should know is that if some message is received ten times and isn’t completed, this message will be sent to the Dead Letter queue. If during message processing your application throws an unhandled error, this message will be returned to the queue.
The first step is installing the Microsoft.Azure.ServiceBus package. It can be done via the NuGet Package Manager.
To send your first message to the queue, you need to connect to the Azure Service Bus Queue. It can be done in the following way:
const string ServiceBusConnectionString = "your connection string";
const string QueueName = "your queue name";
static IQueueClient queueClient;

static async Task MainAsync() {
    queueClient = new QueueClient(ServiceBusConnectionString, QueueName);
    // Register QueueClient's MessageHandler and receive messages in a loop
    RegisterOnMessageHandlerAndReceiveMessages();

    Console.ReadKey();

    await queueClient.CloseAsync();
}
Now we need to register a message handler to start listening to the queue.
static void RegisterOnMessageHandlerAndReceiveMessages() {
    // Configure the MessageHandler Options in terms of exception handling, number of concurrent messages to deliver etc.
    var messageHandlerOptions = new MessageHandlerOptions(ExceptionReceivedHandler) {
        // Maximum number of Concurrent calls to the callback `ProcessMessagesAsync`, set to 1 for simplicity.
        // Set it according to how many messages the application wants to process in parallel.
        MaxConcurrentCalls = 1,

        // Indicates whether MessagePump should automatically complete the messages after returning from User Callback.
        // False below indicates the Complete will be handled by the User Callback as in `ProcessMessagesAsync` below.
        AutoComplete = false
    };

    // Register the function that will process messages
    queueClient.RegisterMessageHandler(ProcessMessagesAsync, messageHandlerOptions);
}
Before sending our first message to the queue, we need to prepare a method to process messages that will be received from the queue. In the code above, we registered the handler method with the name “ProcessMessagesAsync”. Let’s implement this method in the following way:
static async Task ProcessMessagesAsync(Message message, CancellationToken token) {
    // Process the message
    Console.WriteLine($"Received message: SequenceNumber:{message.SystemProperties.SequenceNumber} Body:{Encoding.UTF8.GetString(message.Body)}");

    // Complete the message so that it is not received again.
    await queueClient.CompleteAsync(message.SystemProperties.LockToken);
}
Note, that if you don’t complete your message by CompleteAsync method, or set it to autocomplete, you will receive it again.
The last step is sending our first message to the queue.
// Create a new message to send to the queue
var message = new Message(Encoding.UTF8.GetBytes(messageBody));

// Send the message to the queue
await queueClient.SendAsync(message);
After this step, you can go to the Azure portal and see that the messages counter is now higher than zero. If you check your console, you will see that you received a new message from the queue.
As you see, it is really easy-to-use. You don’t need to write a lot of code to implement interservice messaging using Azure Service Bus. Also, you don’t need to control processing your messages. If something goes wrong and you receive an exception, this message will automatically return to the queue. Even more, you don’t need to worry about an infinitive message receiving (loop), because when the message causes an error several times, it goes to the Dead Letter queue. After that, the message won’t be received.
We will get the following flow once the order is updated:
- The Order microservice sends a message containing the updated order to the orders queue;
- The Analytics microservice that is listening to this queue receives this message;
- The Analytics microservice processes this message, updating entities regarding the new order model and triggering analytics recalculation;
- The Analytics microservice recalculates some analytics data and completes this message.
In this case, we will have actual analytics data right after order updating. We should implement the same flow for creating and deleting orders.
Advantages of this approach:
- We can easily synchronize data between the services;
- We don’t need to have both services online, and we can just run analytics microservice by schedule to receive and process messages, calculate necessary data, and switch microservice to sleep mode;
- If message processing fails, it will resend automatically. No need to create some special functions or even try-catch statements;
- Message can’t be lost. Even if it can’t be processed, it goes to the Dead Letter queue, and you can easily control your failed messages.
Important notes:
- Data won’t be synchronized immediately. First, it goes to the queue, then it is received and finally processed. If you need data synchronization immediately, you should use direct requests to update an entity, but it can harm performance and bring some additional problems;
- You should control instances in the application that are listening to the queue. Use singleton classes to listen to the queue, or you can get an error when the same message is received several times by the same application.
Dead Letter queue in Azure Service Bus
When you get some errors or failure on message processing several times, or your message has just expired, it can be moved to the Dead Letter queue. These messages will be stored in this queue until you delete them or process them. Dead Letter queue can send messages to the receiver, and you can easily work with these messages as in any other queue. The only difference between these queues – name. If you want to start listening to the Dead Letter queue, you should use the next statement:
const string ServiceBusConnectionString = "your connection string";
const string QueueName = "your queue name";
static IQueueClient deadLetterQueueClient;

static async Task MainAsync() {
    deadLetterQueueClient = new QueueClient(ServiceBusConnectionString, EntityNameHelper.FormatDeadLetterPath(QueueName));
    RegisterOnMessageHandlerAndReceiveMessages();

    Console.ReadKey();

    await queueClient.CloseAsync();
}
You should just pass your queue name to EntityNameHelper’sFormatDeadLetterPath method and use the result as a queue name. For each queue you created in Azure Service Bus, there is an additional Dead Letter queue.
Also, you can view Dead Letter in Azure Portal without any code implementation. However, you can use this code sample to create, for example, a Dead Letter processing function, that will notify you about errors in your application or even resolve them.
Summary
In some cases, we can’t create fully independent microservices. At this point, we may need to implement communication between the services, which can be done by interservice messaging. We recommend you to use Azure Service Bus to transfer data in the application, create interservice messaging, and synchronize data between microservices in your application.
This feature is really easy to implement in any existing application. With the help of this service, you can reduce system load, because your application will be able to process tasks one-by-one, not at the same time, as with direct requests.
In microservices-based architecture, communication between microservices will play an important role when it comes to performance. So based on your requirement, you have to choose the right approach for interservice communication.
See how we developed a solution for clear-cut fitness logistics using .NET framework