Applications and web services nowadays are the core of any business, so even small firms have their own sites or mobile apps. The latency that users experience to get some data profoundly impacts their impression of using your solution, especially if the aim of the site is selling some goods. Moreover, a lengthy page load time also has implications on SEO (Search Engine Optimization) and can reduce traffic further. Caching mechanisms were created to help eliminate such problems. They can also be used for reducing unnecessary requests to the data layer by storing computed data in memory so that future requests to be served right away and consumption of such resources as, for example, memory to be reduced. For high traffic services, using the cache mechanism has become a must-have.
Redis is one of the most popular in-memory data storage systems available. In this article, we will provide the readers with a general review of what it is, how it can be used, and also will examine Azure Cache for Redis and basic examples of how to start working with it. So, let us go through all these questions one by one.
Introduction to Redis
As it is mentioned in the official documentation, Redis (which, by the way, means Remote Dictionary Server) is an open-source (BSD licensed), in-memory data structure store, used as a database, cache and message broker.
Substantially, Redis is similar to a key-value store. The difference lies in that in traditional key-value stores you associated string keys to string values, whereas Redis supports more complex data structures such as strings, hashes, lists, sets, sorted sets with range queries, bitmaps, HyperLogLogs, geospatial indexes with radius queries and streams. All keys are binary safe, so you can use any binary sequence as a key, from a string to the content of a JPEG file. Supporting this large set of complex data types is the key difference between Redis and other key-value databases.
Redis is also exceedingly fast. This is one of the reasons why it is used for solutions with rapidly changing and frequently accessed data. Sometimes, because of this, Redis is used as an alternative primary database and some of the developers find it to be a good solution. Despite this, you need to remember, that if your server fails, you lose everything that was in memory, and this is the main argument to use it as transient storage.
As it was mentioned above, Redis is feature-rich and used not just as storage, but also in a number of other use cases, which are listed with a short explanation below:
- User session caching. Storing a lot of data in the cookies makes a negative impact on performance. Instead of this, you can use the in-memory cache.
- Redis Pub/Sub. It is available since version 2.0, and it implements the Publish/Subscribe messaging paradigm with greater scalability due to the separation of subscribers from publishers. They actually do not know anything of each other – publishers publish messages into the channels and subscribers receive messages that are of interest.
- Queues. Two types of queues provide the ability to execute tasks in a particular order or to schedule their execution.
- Counters. The name speaks for itself. You can create named counters, each of which can store the most recent 120 samples at a variety of time precisions (like 1 second, 5 seconds, 1 minute, and so on), and which can be used for real-time analytics.
- It supports the execution of a batch of commands as a single operation in the form of distributed transactions.
- Supports creating your own scripted extensions to the Redis database, using the Lua interpreter built into Redis starting from version 2.6.0.
- It allows creating keys with a limited time-to-live. After the timeout has expired, such key will automatically be deleted.
- Redis Sentinel provides high availability for Redis, so using it one can create a Redis deployment that resists without human intervention to certain kinds of failures.
Redis can be used in many areas such as Gaming, Ad-Tech, Financial Services, Healthcare, and IoT. In fact, it has already been successfully used by many well-known companies, such as Twitter, GitHub, Weibo, Pinterest, Snapchat, Craigslist, Digg, Stack Exchange, Flickr, and many others. The purpose of use varies from company to company. Some of them employ Redis for its intended purpose, for example, GitHub uses it as a persistent key/value store for the routing information and a variety of other data. Stack Exchange uses it as a cache level. Flickr finds Redis Lists very useful and all events, uploads, and updates through the task system are placed in a queue in the form of a Redis list. Digg uses counters functionality for cumulative page event counters. And these are just a few examples. On techstacks.io you can find a huge list of companies that use Redis. The popularity of Redis is growing rapidly and the number of companies also increases.
Azure Cache for Redis
More and more enterprises are moving towards cloud services. There are a lot of big and small companies all over the world, that rely on Microsoft Azure to run their applications. One of the provided features is Azure Cache for Redis – a secure, dedicated cache service from Microsoft. It is based on Redis and can be used in the same way. As it is mentioned in the official documentation, there are many situations, where Azure Cache for Redis can be helpful and they are basically close to Redis use cases. This service available in three tiers, so you can choose the one which fits your business best at the moment. It does not offer a free price tier, and, actually, there’s no point for that, because you can always try Redis locally to understand whether it solves your problems or not and after this move to Azure.
Azure Cache for Redis offers the whole feature set and ecosystem provided by Redis on the one hand, and reliable hosting and monitoring from Microsoft on the other. Here is just a quick overview of the produced goodness:
- Azure Cache for Redis supports a diversity of programming languages like C, C#, Java, PHP, VCL, Fancy, Io, Lua, Perl, Rust, Go, Scala, Matlab, Python, so you are not too limited to choosing a programming language.
- Since the cache layer and application layer are separated, they can be scaled independently, they do not rely on the availability of each other and this further provides more benefits.
- It has the ability to keep data not only in memory but in any persistent data store location. This allows for data to be available after failure events or to backup data and move it to another Redis instance.
- It uses Redis authentication and also supports SSL for securing cache/client communication.
- Microsoft Azure Cache for Redis service also provides such features as replication. If the primary cache fails, the replica becomes the primary one and creates and populates a new replica for it. This process is automatic and is managed by Microsoft Azure.
- Like every Microsoft Azure service, Azure Cache for Redis allows monitoring the service health, usage metrics, cache performance, configuring different kinds of alerts, and so forth.
- You can even schedule a maintenance window for your cache. When it is specified, any Redis server updates are made during this window.
- You can import or export data into/from Azure Cache for Redis, which really helps when you need to pre-populate data or migrate between instances. These operations manipulate with RDB file(s), which are completely compatible with Redis. Therefore, you can export data from any Redis server, no matter where it works, or you can move to any other server without data loss.
A combination of Redis features with reliable hosting and a wide set of tools from Microsoft attracts a large number of companies. Alaska Airlines, SiriusIQ, Stackify, Tata Consultancy Services, and many others choose Azure Cache for Redis for their solutions. Spheres of their business are very different, which once again proves that it can be applied to many areas. Now, when we reviewed the general purposes of Redis usage and have a basic understanding of it, let us go forward and provide a quick start on how to get started with the usage of Microsoft Azure Cache for Redis with .NET.
Azure Cache for Redis: Quick Start
Actually, getting started with Azure Cache for Redis is quite simple. All you need is to create and set up a cache, configure the cache clients so that they can access the cache. We will review each of these steps, to make a clear vision of the process.
Create a cache
Foremost, it should be clarified that this review contains many details that will be more interesting to beginners.
Initially, create an account, if you do not have one, and sign in to the Azure Portal. If you are already familiar with it, you can skip the following explanation, otherwise, here are the steps to create the Azure Cache for Redis service:
- Click on the “Create a resource” button in the top left corner;
- Search for “Azure Cache for Redis” and click on the “Create” button;
- Fill the following fields:
- DNS name – cache name;
- Subscription;
- Resource group;
- Location. You should choose it carefully if you create the service for the existing project, a region should be near to other services that will use the cache;
- Pricing tier. The pricing tier determines the size, performance, and features that are available for the cache. Premium tier provides a wider set of options, for example, it allows you to setup Redis cluster, virtual network, etc, but since we review a basic usage example, we will not review these options;
- “Enable the non-SSL port (6379)” – this option is highly recommended not to use because, in it, the access keys are sent via TCP in clear text and can compromise access to your cache.
After creating the service, its overview page must become available, where you can locate the hostname, usage information, server load information, activity logs, keys, and many other useful information. The next step is to create the project and configure it to use Azure Cache for Redis.
Project and cache client configuration
You can use this service in different kinds of projects, even test it via the Redis command-line tool. In our article, we will review an example of usage in the ASP.NET Core Web Application. We will create a .NET Core project from scratch to cover all the steps needed to get started. For this, perform the next steps:
- open Visual Studio;
- click on the “File” menu option, then select “New” and “Project” options;
- choose “ASP.NET Core Web Application” type;
- enter the project name (for this example it will be “AzureRedisIntro”), its location and click “OK”;
- in the example we will use ASP.NET Core 2.2, so choose it in the dropdown;
- select the “API” template from the list.
Here are screenshots of the project creation step:
Since we use .NET Core, we need to install “Microsoft.Extensions.Caching.Redis.Core” package through the NuGet package manager. For this, just right click on the project name, select “Manage NuGet packages…”, switch to the “Browse” tab and search for it.
To connect to the created Redis service, we need to copy the “Primary connection string” to the configuration file. You can find it on the service overview page by clicking on the “Access keys” section in the navigation pane. So the configuration file should look like this in the end:
{
      "Logging": {
          "LogLevel": {
              "Default": "Warning"
          }
      },
      "AllowedHosts": "*",
      "CacheConnection": "[Primary connection string]"
  }
After these basic preparations, we need to configure the access to the cache Redis service. For this, you need to add the `AddDistributedRedisCache` method to the Startup.cs class. This method allows using the RedisCache via dependency injection in each part of the code that expects an instance object that implements the interface IDistributedCache. Here is the full content of the “Startup.cs” file:
using Microsoft.AspNetCore.Builder;
  using Microsoft.AspNetCore.Hosting;
  using Microsoft.AspNetCore.Mvc;
  using Microsoft.Extensions.Configuration;
  using Microsoft.Extensions.DependencyInjection;

  namespace AzureRedisIntro {
      public class Startup {
          public static string CacheConnection = "";

              public Startup(IHostingEnvironment env) {
                  var builder = new ConfigurationBuilder()
                  .SetBasePath(env.ContentRootPath)
                  .AddJsonFile("appsettings.json", optional: true, reloadOnChange: true)
                  .AddJsonFile($"appsettings.{env.EnvironmentName}.json", optional: true)
                  .AddEnvironmentVariables();
                  Configuration = builder.Build();

                  CacheConnection = Configuration.GetConnectionString("CacheConnection");
              }

              public IConfiguration Configuration { get; }

              // This method gets called by the runtime. Use this method to add services to the container.
              public void ConfigureServices(IServiceCollection services) {
                  services.AddMvc().SetCompatibilityVersion(CompatibilityVersion.Version_2_2);

                  services.AddDistributedRedisCache(options => {
                      options.Configuration = Configuration.GetConnectionString("CacheConnection");
                      options.InstanceName = "RedisIntro"; // Your DNS Name
                  });
              }

              // This method gets called by the runtime. Use this method to configure the HTTP request pipeline.
              public void Configure(IApplicationBuilder app, IHostingEnvironment env) {
                  if (env.IsDevelopment()) {
                      app.UseDeveloperExceptionPage();
                  }
                  else {
                      // The default HSTS value is 30 days. You may want to change this for production scenarios, see https://aka.ms/aspnetcore-hsts.
                      app.UseHsts();
                  }

                  app.UseHttpsRedirection();
                  app.UseMvc();
              }
          }
      }
  }
Using Azure Cache for Redis service
Azure Cache for Redis can cache either serialized .NET objects or primitive data types. For serialization, you can choose any serializer, which is more convenient for you, and in this article, we will use the most common package Newtonsoft.Json. It should be already installed if you repeated all the described steps.
For our pretty simple example, we create a model to review a little bit of storing serialized .NET objects in the cache. For this, just create a new folder “Models” and add the “Book.cs” file, which is listed below, to it:
using System;

  namespace AzureRedisIntro.Models {
      public class Book {
          public Guid ID { get; set; }
          public string Name { get; set; }
          public string Description { get; set; }
      }
  }
The model is pretty small and clean, so there is no comments or explanations provided, and we move towards the controller. After creating the project from a template, you should already have a controller, in our case named “ValuesController”. Replace it with the following code:
using AzureRedisIntro.Models;
using Microsoft.AspNetCore.Authorization;
using Microsoft.AspNetCore.Mvc;
using Microsoft.Extensions.Caching.Distributed;
using Newtonsoft.Json;
using System;
namespace AzureRedisIntro.Controllers {
[Route("api/[controller]")]
[AllowAnonymous]
public class ValuesController : Controller {
private IDistributedCache _cache;
public ValuesController(IDistributedCache cache) {
_cache = cache;
}
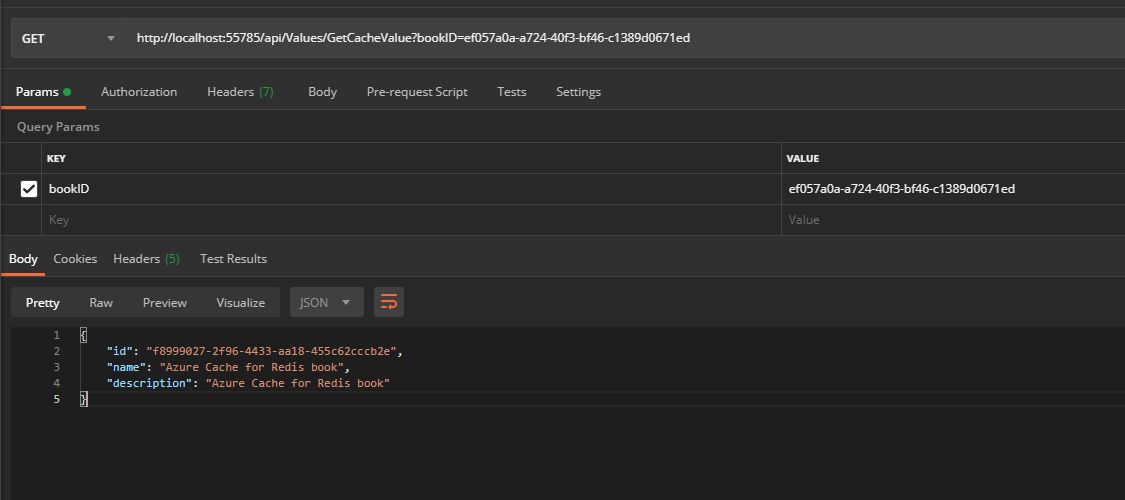
[HttpGet("[action]")]
public object GetCacheValue(Guid bookID) {
if (bookID == Guid.Empty)
return BadRequest("Incorrect identifier.");
return JsonConvert.DeserializeObject(_cache.GetString(bookID.ToString()));
}
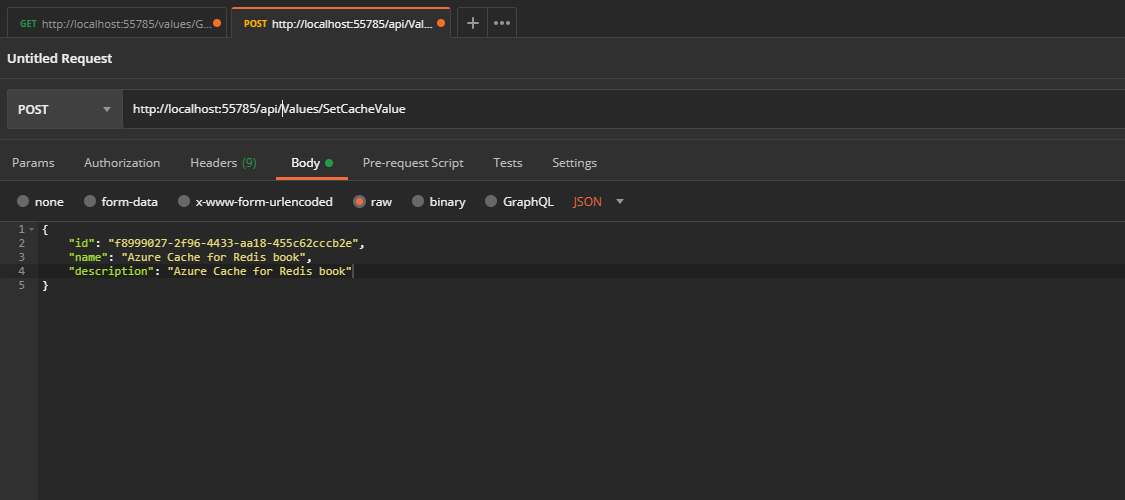
[HttpPost("[action]")]
public object SetCacheValue([FromBody]Book model) {
if (model == null)
return BadRequest("Model is empty.");
Book book = new Book() {
Description = model.Description,
Name = model.Name,
ID = model.ID
};
_cache.SetString(book.ID.ToString(), JsonConvert.SerializeObject(book));
return Ok();
}
}
}
Let us review each part of the code, to get a deeper understanding of the process. We mentioned IDistributedCache interface before, so the role of it should be clear for now, so we just review the provided methods:
- Get, GetAsync – accepts a string key and retrieves a cached item as a byte[] array if found in the cache;
- Set, SetAsync – adds an item (as byte[] array) to the cache using a string key;
- Refresh, RefreshAsync – refreshes an item in the cache based on its key, resetting its sliding expiration timeout (if any);
- Remove, RemoveAsync – removes a cache item based on its string key.
In the example, via “GetCacheValue” and “SetCacheValue” methods, we showed the usage of the first two from the list (and, as you can see, synchronous variants). After running an example these methods should return the next results:
As you can see after these short reviews, all is fairly simple, and Azure Cache for Redis is really easy-to-use and easy-to-start service.
To Summarize
In this article, we tried to make a general overview of Redis and Azure Cache for Redis, to show provided benefits and use cases. Most of the information must be useful for beginners, or people who are interested in some details of usage. We hope this article gave beginners a start point and inspired others to learn something new about it or even start using it.