Are you curious about React and want to learn its tricks? Maybe you’ve tried tutorials in the past, but struggled to understand State core concepts? Maybe you’re looking for a framework for your project?
React.js is one of the most popular JavaScript libraries in the world, created by Facebook in 2013. It is best suited for single-page applications with dynamic content and progressive web apps. Actually, it’s a good choice for any type of web development that requires building fast, scalable, and maintainable solutions.
If you want to develop an e-commerce platform, a food delivery app, an analytics tool, a messenger, or an enterprise app, React.js is the right fit for you.
If you already know React.js, you can easily master the React Native framework that allows tapping into mobile app development and delivering native-like experiences for iOS and Android users.
It is used by such sites as Facebook, Instagram, Netflix, and New York Times. Using React, we get high speed, ease of scaling and development. In this article we will analyze State — one of the important aspects of React.js.
Contents:
- What Is State?
- State Initialization
- Work with State
- Using prevState
What is State in React.js?
State in React.js is a standard Javascript object the main purpose of which is interactivity that is necessary for data fixing and transmission, which may be changed after a while. The change of State depends on the application’s functionality. The changes may be based on users’ response, new messages on server-side, network response, etc. The only single demand to the State that React requires is the data type: it has to be an object. An application defines what is stored inside.
State Initialization
State initialization is executed only within class-based components which are stateful components (with the internal State).
There are two options to initialize State in React.js:
1) Inside the constructor
this.state = { ... }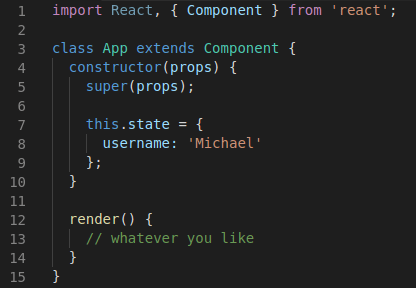
Bear in mind that state is a property of class-components, and after a component’s class is created, the first requested method is a constructor, which is a perfect place for initialization of the State and everything else.
A class sample will also be created in memory, and you will be able to use its `this` for installing properties `this.state` = (7 line). Constructor is the only place where you can write through equal sign.
It is also important to request `super(props)` (5 line) – the base class constructor. This constructor requests by the default super with all passing arguments.
2) Directly inside the class
state = { ... }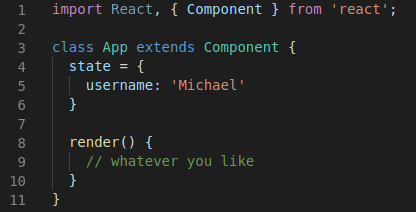
At the time of writing this article, the second option to initialize State isn’t a part of official JS specification. So, we need a Babel – Stage 3 to execute it.
In this case, there is no constructor. Reference on the State performs directly. Visual area is inside of the class but not inside the method and you can request `this.props`, React.js `this.state.`
Which one to choose?
It’s up to you. We prefer the second option.
Work with State
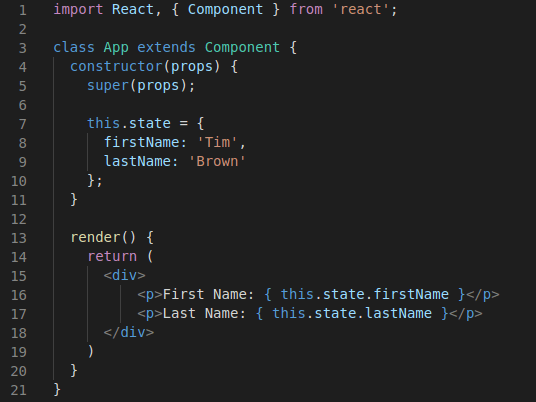
Our State contains an object with two fields: firstName and lastName. Whatever option we use to initialize it, we will refer to it through `this.state.nameState`. We can do that within the methods of the component lifecycle or within the methods that we will write to our class.
In the example below, with render() method, let’s import data from the state:
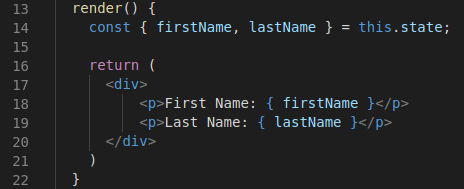
Developers usually write more accurate code by using (ES6) for State:
Such code will give the following result:

State management with the help of setState()
To manage State, React provides a special `setState()` method. We should pay attention to how it works. We offer an object that contains part of the information which we want to update. In the beginning, the values in the transmitting object will be equal to the values of the component State, and then, `setState()` will either update or add new values to the State.
As an example, we will add a button, and by clicking it with the help of handleClick method will change the state:
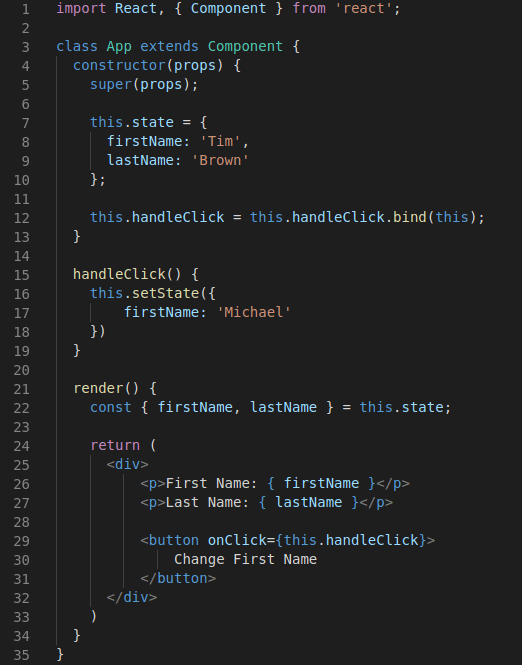
After handleClick method is requested, inside it a `this.setState({ firstName: ‘Michael’ })` method is requesting, where values firstName we change to ‘Michael’. After that React joins already existing state with an object that is passing to `setState()`.
setState applies only those part of State that has to be changed. This new object will lay over the existing State. It is a very convenient feature of React that acts as protection from errors and enables writing a cleaner code.
Next, setState launches the process of the synchronization with DOM, creates a new elements tree of the virtual ReactDOM, compares it with the previous elements tree, and finally define what had happened and how to execute it in the best way. Afterwards, the final DOM updates in the browser, and we get First Name: Michael.
Using of prevState
In order to understand what prevState is, let’s create a component with one checkbox. When we make a click on it, its attribute will be changed on chosen/unchosen.
At first glance, it seems logical to change in `setState` false on true with an exclamation mark and vice versa, just like in the example below:
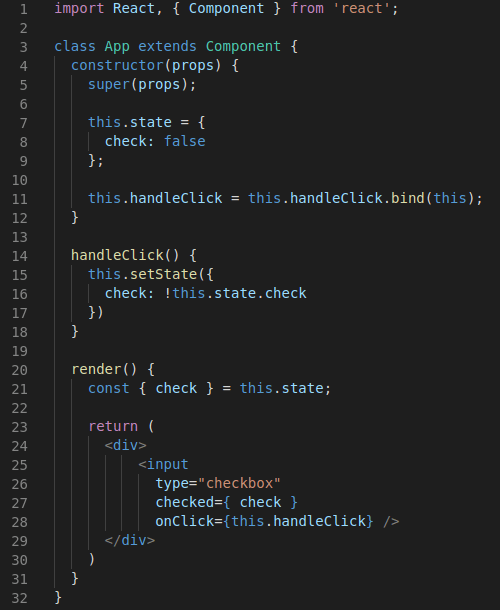
But it is wrong. It is very important to understand that in some cases, method `setState()` works asynchronously. Not always, but in certain cases. Therefore, it is fine to deem that the State is installing not instantly, and may be installed after a while. Thus, when a user clicks on the checkbox and we call handleClick, `this.state` value may not be updated. React does it to optimize performance. React can execute only one state update of an application on several calls of `setState()` during the performance optimization. In other words, we can not expect that our State represents its latest version.
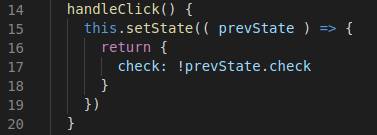
To fix that, we need to call `setState` in another way, otherwise, instead of passing a new state which we want to update, we will transmit one more function to setState which is receiving our current State, `this.setState(( prevState ) => {})`. This will be a signal to React that this `setState` needs to be executed only when our current State will be in the final state and ready to compute new state.
When you compute new State, always use an option with a function depending on the current State.
Let’s change our handleClick method as shown in the example below, and everything will work correctly:
Conclusions:
- Component’s state contains in the State field;
- `this.state` is initializing in the constructor or class body;
- After initialization, State cannot be changed (reading only);
- To update State, use `setState()` method;
- In setState() it is necessary to transmit only the changed in State;
- State update that depends on the previous one needs to be executed through `setState` function.
We hope this article helped you to understand what state is and how to use it.
About Redwerk
We are an offshore software development company that has excelled in the creation of web, mobile, and desktop applications throughout manifold programming languages, including React. Our core specialization covers E-commerce, Business Automation, E-health, Media & Entertainment, E-government, GameDev, Startups & Innovation. Redwerk has hundreds of omnifarious projects successfully delivered to clients across the globe. With a passion for perfection, we constantly follow the IT industry innovations and apply them in our work.