In the first part of the article, we briefly reviewed two popular search-as-a-services: Microsoft (MS) Azure Search and Elasticsearch. In this part, we will show in practice how to work with some commonly used features of Azure Search on the example of searching the restaurant.
Overview of the Azure Portal and Creating Azure Search Resource
We will provide a walkthrough on how to create an Azure free account (with a brief overview of the Azure portal itself), search resource and how to work with them. MS Azure supplies the ability to create a free trial account with $200 credit for 30 days, 12 months of popular free services and, of course, 25+ always free services. You need to provide a phone number, a credit or debit card, and an MS Account username to start using it. Also, keep in mind, that for creating an account, you need to have some money on your card, because you may see a one-dollar verification hold on your credit card account, which is removed within three to five days. On the “Azure Free Account FAQ” page you can read a bit more about provided services and trial accounts.
After get registered on the portal, you see your dashboard. In the top right corner, there is short information about your account (email and avatar), by clicking on which you are able to review your settings, billing information, etc. To create a new search resource you need to click on the “Create a resource” left side menu option, which is in the top of the list. By clicking on this option, you see the marketplace, where you can find needed service through search input. After selecting “Azure Search resource”, you see a form, with the next fields:
- URL – you need to provide a service name, which is also a part of the URL endpoint against which API calls are issued. For example, our test endpoint will be https://intro.search.windows.net, so in the URL field was entered “intro”.
- Subscription – select needed subscription (you can have more than one). If you create a free trial account, then you see “Free Trial” subscription selected. Azure Search can autodetect Azure Table and Blob storage, SQL Database, and Azure Cosmos DB for indexing, but only for the services within the same subscription.
- Resource group is a collection of Azure services and resources used together. For example, if you use Azure Search to index a SQL database, then both services will be a part of the same resource group. If you have just created an account, then you can click on the “Create new” button below the field and create the resource group by entering a name.
- Location, it is where an Azure service will be hosted. And for future reference, you need to keep in mind, that prices can differ by geography, and, if you are planning to use cognitive search, you need to choose a region with feature availability.
- Pricing tier – currently Free, Basic, and Standard pricing tiers are offered. Each of them has its own capacity and limits. For this example, we will choose “Free” pricing tier, which is limited to three indexes, three data sources, and three indexers. For future needs, you have to remember that a pricing tier cannot be changed once the service is created. If you will need a higher or lower tier later, then you will need to re-create the service. See “Choose a pricing tier or SKU for Azure Search” guidance from an official site for more information.
On the screenshots below is shown a short process of creation:
After clicking on the “Create” button, you will see the created resource. Click on it to get detailed information, as it is shown below:
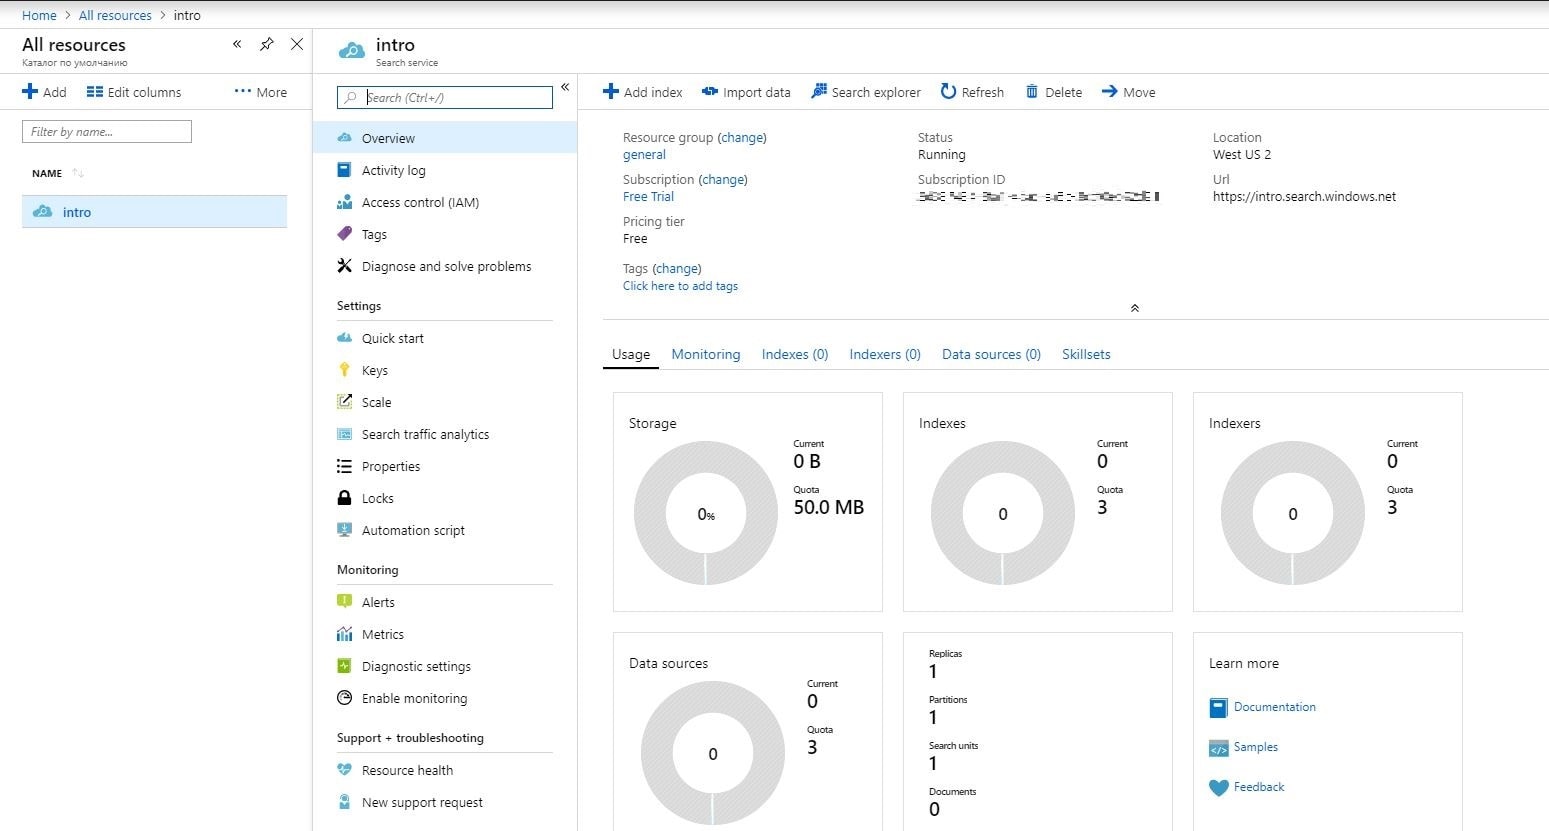
On the service overview page, you can locate the URL endpoint, usage information, activity logs, keys, and much other useful information. You also need your keys, which you can find by clicking on the “Keys” section in the navigation pane. When creating our test project, you will need to copy one of the admin keys (they are equivalent), as this is required for creating, updating, and deleting objects on the service.
So, let us create the project and start exploring the Azure Search functionality. We will add new functions gradually to consistently review all the steps and to achieve a maximum understanding of what is being done.
Project and Index Creation
Azure Search functionality is exposed through a REST API or .NET SDK. In this example, we will use Azure Search .NET SDK, which supports applications targeting the .NET Framework 4.5.2 and higher, as well as .NET Core. You can choose the one that fits you best, but in the example, we will create a .NET Core project:
- open Visual Studio;
- click on the “File” menu option, then select “New” and “Project” options;
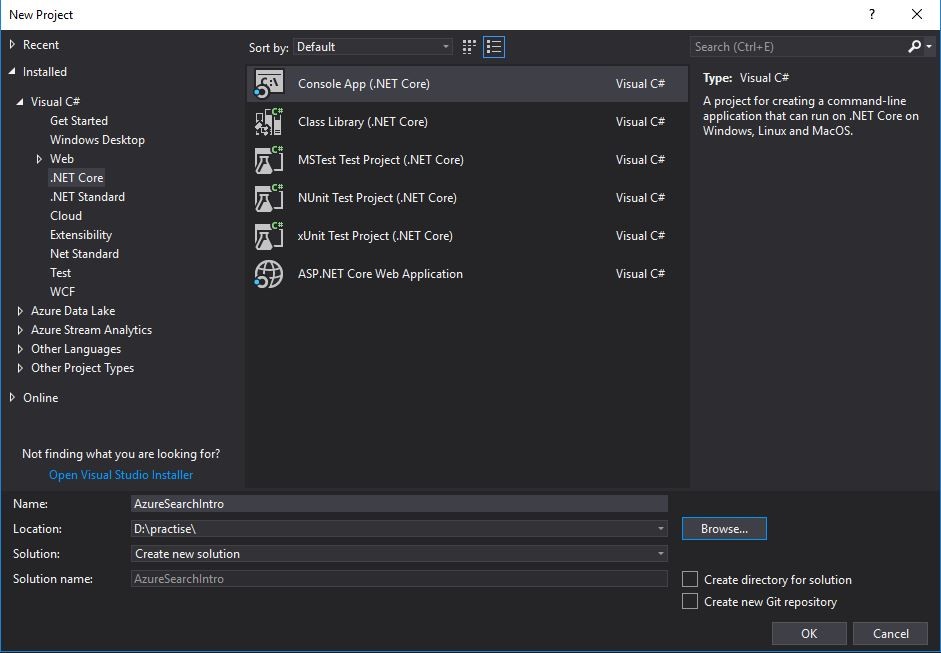
- choose “Console App (.NET Core)” type;
- enter your project name, its location and click “OK”.
Our project name will be “AzureSearchIntro” and here is the screenshot of the project creation step:
As we will use the .NET SDK, now, we need to download it through the NuGet package manager. For this, just right click on the project name, select “Manage NuGet packages…”, switch to “Browse” tab and search for the “Microsoft.Azure.Search” package.
We will also add a configuration file for keeping all keys in one place. For this you need to:
- add the following NuGet packages:
- Microsoft.Extensions.Configuration;
- Microsoft.Extensions.Configuration.FileExtensions;
- Microsoft.Extensions.Configuration.Json;
- create a JavaScript JSON Configuration file: right click on the project name, select “Add”, then “New Item…” option, select “JavaScript JSON Configuration File” type and name it (e.g. “appsettings.json”);
- make sure that the appsettings.json file the property “Copy to Output Directory” is set to “Copy if newer” so that the application is able to access it when published.
Put your service name and API key, so that the configuration file look like this:
{
      "SearchServiceName": "intro",
      "SearchServiceAPIKey": "[API key]"
  }
After this, we need to create a model, which will represent a document in the index. Add a new class (right click on the project name, select “Add”, then “New Item…” option, select “Class” type and name it “Restaurant”). You can enter any name as you wish instead of shown in the example, just keep in mind that when copying the code. Here is the code of this file, which you need to insert:
using Microsoft.Azure.Search;
  using Microsoft.Azure.Search.Models;
  using Microsoft.Spatial;
  using System.ComponentModel.DataAnnotations;

  namespace AzureSearchIntro {
      [SerializePropertyNamesAsCamelCase]
      public class Restaurant {
          [Key]
          [IsFilterable]
          public string RestaurantId { get; set; }

          [IsSearchable, IsFilterable, IsSortable]
          public string Name { get; set; }

          [IsFilterable, IsSortable, IsFacetable]
          public double? Rating { get; set; }

          [IsFilterable, IsSortable]
          public GeographyPoint Location { get; set; }

          [IsFilterable, IsSortable, IsFacetable]
          public int? WorkingHoursStart { get; set; }

          [IsFilterable, IsSortable, IsFacetable]
          public int? WorkingHoursEnd { get; set; }

          [IsSearchable, IsFilterable, IsSortable]
          public string PhoneNumber { get; set; }
      }
  }
As you can see, each public property is decorated with attributes, the definition of which described below:
- IsSearchable marks the field as full-text searchable. This also means that it will go through analysis such as word-breaking during indexing, e.g. if you set a searchable field to a value like “azure search”, internally it will be split into two individual tokens “azure” and “search”.
- IsFilterable allows the field to be referenced in filter queries. This attribute differs from IsSearchable in how strings are handled. Filterable fields of type Edm.String or Collection(Edm.String) do not undergo word-breaking, so comparisons are for exact matches only. For example, if you set such a field value to “azure search”, then filter by ‘azure’, there will be no matches founded, but if you filter by ‘azure search’ matches will appear.
- IsSortable indicates whether the field can be used in OrderBy expressions. By default, the system sorts results by score, but according to the experiences, users will want to sort by fields in the documents. Fields of type Collection(Edm.String) cannot be sortable.
- IsFacetable is typically used in a presentation of search results that includes hit count by category. This option cannot be used with fields of Edm.GeographyPoint type.
You can read more information about attributes from the official documentation. Also, remember that the length of the filterable, sortable, or facetable Edm.String fields cannot be more than 32 kilobytes. This is because such fields are treated as a single search term, and the maximum length of a term in Azure Search is 32K kilobytes. You can store more text in a single string field if it is excluded from the index. The field counted as excluded when it does not have filterable, sortable, and facetable attributes (or in the REST API they are explicitly set to false). This is useful for fields that are not used in queries but are needed in search results. Excluding fields from the index also improves performance.
The `SerializePropertyNamesAsCamelCase` attribute actually tells the SDK to map the property names to camel-case automatically. It ensures that Pascal-case property names in the model class are mapped to camel-case field names in the index.
When designing model classes to map to an Azure Search index, the official Microsoft recommendation is to declare properties of value types such as bool and int to be nullable. If you do not use a nullable property, you have to guarantee that no documents in your index contain a null value for the corresponding field. For example, all types are nullable in Azure Search, so when you add a new field of type Edm.Int32 to an existing index, after updating the index definition, all documents will have a null value for that new field. If you then use a model class with a non-nullable int property for that field, you will get a `JsonSerializationException` when trying to retrieve documents.
Now, let us update the main program with the next code:
using Microsoft.Azure.Search;
  using Microsoft.Azure.Search.Models;
  using Microsoft.Extensions.Configuration;
  using System;

  namespace AzureSearchIntro {
      class Program {
          static void Main(string[] args) {
              var builder = new ConfigurationBuilder().AddJsonFile("appsettings.json");

              IConfigurationRoot configuration = builder.Build();

              string searchServiceName = configuration["SearchServiceName"];
              string apiKey = configuration["SearchServiceAPIKey"];

              SearchServiceClient serviceClient = new SearchServiceClient(searchServiceName, new SearchCredentials(apiKey));

              if (!serviceClient.Indexes.Exists("restaurants")) {
                  var restaurantsIndex = new Index() {
                      Name = "restaurants",
                      Fields = FieldBuilder.BuildForType()
                  };
                  serviceClient.Indexes.Create(restaurantsIndex);
              }

              Console.WriteLine("{0}", "Complete. Press any key to end application...\n");
              Console.ReadKey();
          }
      }
  }
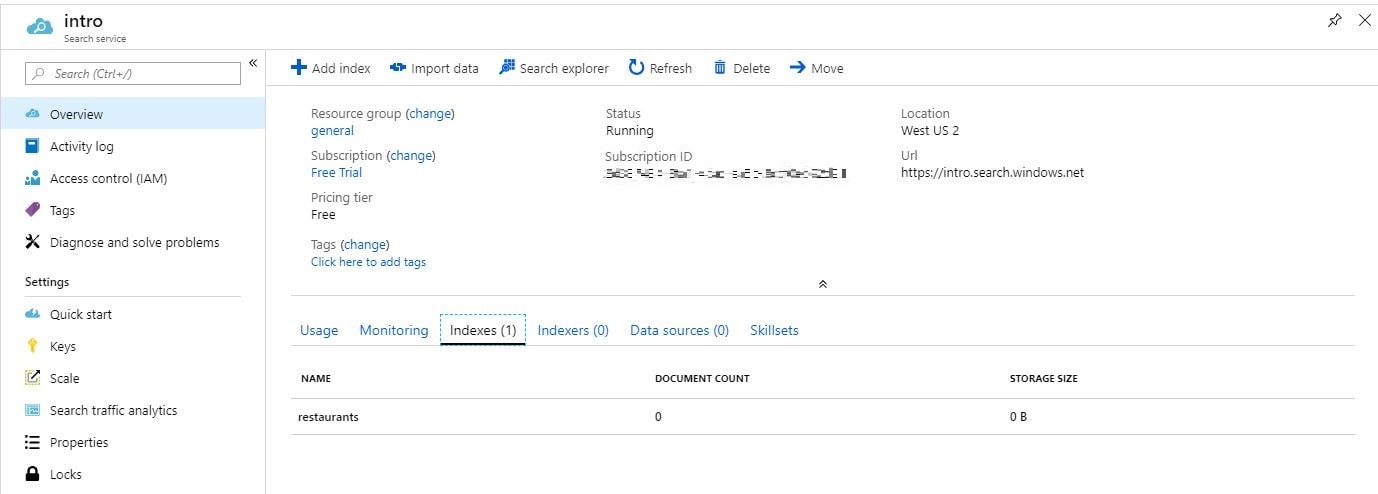
As you can see, at first we retrieve the service name and API key from the appsettings.json file and create a new `SearchServiceClient` object, which allows managing indexes. Next, the Main checks whether the index with name “restaurants” exists, and if no, create it. If you run this example, you will see in the Azure portal that you now have 1 index with 0 documents and 0B storage size.
Populate Index With Documents
The next step is to populate the index with documents. The code below represents the “Program.cs” file and contains the code for populating index with test data:
using Microsoft.Azure.Search;
  using Microsoft.Azure.Search.Models;
  using Microsoft.Extensions.Configuration;
  using Microsoft.Spatial;
  using System;
  using System.Linq;
  using System.Threading;

  namespace AzureSearchIntro {
      class Program {
          static void Main(string[] args) {
              var builder = new ConfigurationBuilder().AddJsonFile("appsettings.json");

              IConfigurationRoot configuration = builder.Build();

              string searchServiceName = configuration["SearchServiceName"];
              string apiKey = configuration["SearchServiceAPIKey"];

              SearchServiceClient serviceClient = new SearchServiceClient(searchServiceName, new SearchCredentials(apiKey));

              if (!serviceClient.Indexes.Exists("restaurants")) {
                  var restaurantsIndex = new Index() {
                      Name = "restaurants",
                      Fields = FieldBuilder.BuildForType()
                  };
                  serviceClient.Indexes.Create(restaurantsIndex);
              }

              ISearchIndexClient indexClient = serviceClient.Indexes.GetClient("restaurants");

              if (indexClient.Documents.Count() == 0)
              UploadDataToIndex(indexClient);

              Console.WriteLine("{0}", "Complete. Press any key to end application...\n");
              Console.ReadKey();
          }

          public static void UploadDataToIndex(ISearchIndexClient indexClient) {
              var restaurants = new Restaurant[] {
                  new Restaurant() {
                      RestaurantId = "1",
                      Name = "Best restaurant",
                      Rating = 2.7,
                      WorkingHoursStart = 8,
                      WorkingHoursEnd = 22,
                      PhoneNumber = "1-800-437-4370",
                      Location = GeographyPoint.Create(47.679512, -122.132441)
                  },
                  new Restaurant() {
                      RestaurantId = "2",
                      Name = "Italian food",
                      Rating = 4.8,
                      WorkingHoursStart = 10,
                      WorkingHoursEnd = 23,
                      PhoneNumber = "1-800-477-4777",
                      Location = GeographyPoint.Create(50.496163, 30.523571)
                  },
                  new Restaurant() {
                      RestaurantId = "3",
                      Name = "Chinese food",
                      Rating = 4.9,
                      WorkingHoursStart = 7,
                      WorkingHoursEnd = 23,
                      PhoneNumber = "1-800-480-4800",
                      Location = GeographyPoint.Create(50.447258, 30.526541)
                  }
              };

              var batch = IndexBatch.MergeOrUpload(restaurants);

              try {
                  indexClient.Documents.Index(batch);
              }
              catch (IndexBatchException e) {
                  string failedDocuments = String.Join(", ", e.IndexingResults.Where(r => !r.Succeeded).Select(r => r.Key));
                  Console.WriteLine($"Failed to index next documents: {failedDocuments}");
              }
              Console.WriteLine("Indexing documents.\n");
              Thread.Sleep(2000);
          }
      }
  }
In `Main`, we check whether or not the index has documents. And if no, through the `UploadDataToIndex` method an array of Restaurant objects is created, then an IndexBatch containing the documents is created, and the operation is specified, which must be applied to the batch. The batch is then uploaded to the Azure Search index by the `Documents.Index` method. Please, note that all the phone numbers and coordinates are fictional and do not belong to any existing location. In this example, we use the method `MergeOrUpload` to upload documents, but you can use any suitable method from the following list:
- Upload, the document will be inserted if it is new and updated (replaced) if it is existing one. Note that all fields are replaced in the update case.
- Merge updates an existing document with the specified fields. If the document doesn’t exist, the merge fails. Any field you specify in the merge will replace the existing field in the document.
- MergeOrUpload, if the document with the given key already exists in the index, it will be replaced, otherwise, it will be added.
The other thing to notice is a catch block that handles an indexing error. Azure Search service can fail to index some of the documents in the batch if your service is under heavy load. The official Microsoft recommendation is to handle this case and retry indexing failed documents, or do something else depending on your needs, e.g. at least write to the log file.
Searching for Documents
The last and the most interesting step is searching for documents in the index. Update the “Program.cs” file with the next code:
using Microsoft.Azure.Search;
  using Microsoft.Azure.Search.Models;
  using Microsoft.Extensions.Configuration;
  using Microsoft.Spatial;
  using System;
  using System.Collections.Generic;
  using System.Linq;
  using System.Threading;
  using System.Threading.Tasks;

  namespace AzureSearchIntro {
      class Program {
          static void Main(string[] args) {
              var builder = new ConfigurationBuilder().AddJsonFile("appsettings.json");

              IConfigurationRoot configuration = builder.Build();

              string searchServiceName = configuration["SearchServiceName"];
              string apiKey = configuration["SearchServiceAPIKey"];

              SearchServiceClient serviceClient = new SearchServiceClient(searchServiceName, new SearchCredentials(apiKey));

              if (!serviceClient.Indexes.Exists("restaurants")) {
                  var restaurantsIndex = new Index() {
                      Name = "restaurants",
                      Fields = FieldBuilder.BuildForType()
                  };
                  serviceClient.Indexes.Create(restaurantsIndex);
              }

              ISearchIndexClient indexClient = serviceClient.Indexes.GetClient("restaurants");

              if (indexClient.Documents.Count() == 0)
              UploadDataToIndex(indexClient);

              Console.WriteLine("Searching...\n");

              DocumentSearchResult results = SearchRestaurants(indexClient).GetAwaiter().GetResult();

              Console.WriteLine($"Number of results: {results.Count}\n");

              foreach (var item in results.Results) {
                  Console.WriteLine($"Score: {item.Score}");
                  Console.WriteLine($"Name: {item.Document.Name}");
                  Console.WriteLine($"Rating: {item.Document.Rating}");
                  Console.WriteLine($"WorkingHoursStart: {item.Document.WorkingHoursStart}");
                  Console.WriteLine($"WorkingHoursEnd: {item.Document.WorkingHoursEnd}");
                  Console.WriteLine($"PhoneNumber: {item.Document.PhoneNumber}");
                  Console.WriteLine("------------------------");
              }

              Console.WriteLine("Complete. Press any key to end application...\n");
              Console.ReadKey();
          }

          public static void UploadDataToIndex(ISearchIndexClient indexClient) {
              var restaurants = new Restaurant[] {
                  new Restaurant() {
                      RestaurantId = "1",
                      Name = "Best restaurant",
                      Rating = 2.7,
                      WorkingHoursStart = 8,
                      WorkingHoursEnd = 22,
                      PhoneNumber = "1-800-437-4370",
                      Location = GeographyPoint.Create(47.679512, -122.132441)
                  },
                  new Restaurant() {
                      RestaurantId = "2",
                      Name = "Italian food",
                      Rating = 4.8,
                      WorkingHoursStart = 10,
                      WorkingHoursEnd = 23,
                      PhoneNumber = "1-800-477-4777",
                      Location = GeographyPoint.Create(50.496163, 30.523571)
                  },
                  new Restaurant() {
                      RestaurantId = "3",
                      Name = "Chinese food",
                      Rating = 4.9,
                      WorkingHoursStart = 7,
                      WorkingHoursEnd = 23,
                      PhoneNumber = "1-800-480-4800",
                      Location = GeographyPoint.Create(50.447258, 30.526541)
                  }
              };

              var batch = IndexBatch.MergeOrUpload(restaurants);

              try {
                  indexClient.Documents.Index(batch);
              }
              catch (IndexBatchException e) {
                  string failedDocuments = String.Join(", ", e.IndexingResults.Where(r => !r.Succeeded).Select(r => r.Key));
                  Console.WriteLine($"Failed to index next documents: {failedDocuments}");
              }
              Console.WriteLine("Indexing documents.\n");
              Thread.Sleep(2000);
          }

          public static async Task<DocumentSearchResult> SearchRestaurants(ISearchIndexClient indexClient) {
              List resultsList = new List();

              var parameters = new SearchParameters();
              parameters.Filter = "rating gt 4 and (geo.distance(location, geography'POINT(30.521541 50.444158)') le 30)";

              parameters.OrderBy = new[] { "rating desc" };
              parameters.QueryType = QueryType.Full;
              parameters.SearchMode = SearchMode.All;
              parameters.IncludeTotalResultCount = true;
              parameters.Top = 10;

              string azureSearch = $"(name:(('/.*food.*/'))) || (name:(('/.*Chinese.*/')))";

              try {
                  var docResults = await indexClient.Documents.SearchAsync(azureSearch, parameters);
                  return docResults;
              }
              catch (Exception e) {
              }
              return null;
          }
      }
  }

  The following example will return the next search results after running:

  Searching...

  Number of results: 2

  Score: 1.4142135
  Name: Chinese food
  Rating: 4.9
  WorkingHoursStart: 7
  WorkingHoursEnd: 23
  PhoneNumber: 1-800-480-4800
  ------------------------
  Score: 0.35355338
  Name: Italian food
  Rating: 4.8
  WorkingHoursStart: 10
  WorkingHoursEnd: 23
  PhoneNumber: 1-800-477-4777
  ------------------------
  Complete. Press any key to end application...
Let us review in detail the “SearchRestaurants” method. A query accepts several parameters that provide query criteria and also specify search behavior:
-
- Filter expressions constrain the search to specific fields or add match criteria. They can be executed standalone as a fully expressed query, or clarify a query that has additional parameters. We will review filter expressions later below the search parameters overview.
- OrderBy parameter accepts a list of the sort criteria, where each of criteria can be the name of a sortable field, a call to the geo.distance or the search.score functions. You can use asc (default order) or desc to specify the sort order. The order of expressions determines the final sort order.
- QueryType specifies which parser should be used. Can be two types:
- the default simple query parser, which is optimal for full text search (`QueryType.Simple`);
- the full Lucene query parser used for advanced query constructs like regular expressions, proximity search, fuzzy and wildcard search, etc (`QueryType.Full`).
- SearchMode indicates whether any (“SearchMode.Any” default option) or all (“SearchMode.All”) of the search terms must be matched in order to count the document as a match.
- IncludeTotalResultCount specifies whether the total count of results is needed or not in the response. The default value is false.
- Top specifies how many items need to be returned. Can be also used with “Skip” parameter for pagination, which specifies how many items need to be skipped.
- SearchFields is an optional parameter and used to constrain the search to specific fields. So, you can replace the azureSearch variable, shown above, with the next few lines of code:
 parameters.SearchFields = new[] { "name" };
  string azureSearch = $"('/.*food.*/') || ('/.*Chinese.*/')";
The filter parameter is the basis of several search experiences, such as geolocation search, faceted navigation, etc. As it was mentioned earlier in the text, we review the list of filter operators, which can be used:
- logical operators (`and`, `or`, `not`);
- Comparison expressions:
- `eq` – equals;
- `ne` – not equals;
- `gt` – greater than;
- `lt` – less than;
- `ge` – greater than or equals;
- `le` – less than or equals.
- Constants of the supported types and references to field names (with Filterable attribute);
- `any` and `all`. Both are supported on fields of `Collection(Edm.String)` type but can be used with different expressions:
- `any` can only be used with simple equality expressions or with a `search.in` function;
- `all` can only be used with simple inequality expressions or with a `not search.in`.
- Geospatial functions `geo.distance` and `geo.intersects`, which are used for “find near me” or map-based search controls;
- The `search.in` function, which checks whether a given string field is equal to one of a given list of values;
- The `search.ismatch` function evaluates search query as a part of a filter expression and returns all documents that match this query;
- The `search.ismatchscoring` function is pretty similar to the `search.ismatch` function. The only difference is that the relevance score of documents matching the `search.ismatchscoring` query will impact to the overall document score, while in the case of `search.ismatch`, the document score will not be changed.
You can read more about the intricacies of each of the described parameters in the official documentation.
The last, but not less interesting thing, which we are about to discuss is term boosting. It ranks a document higher if it contains the boosted term, relative to documents that do not contain the term. It differs from scoring profiles in that scoring profiles boost certain fields, not specific terms. To boost a term you need to use the “^” symbol with a boost factor (a number) at the end of the term you are searching for. The higher the boost factor, the more relevant the term will be relative to other search terms. By default, the boost factor is 1. It can be less than 1, but never a negative value. The following example helps illustrate the usage of term boosting. Update the `SearchRestaurants` method with the next code:
public static async Task<DocumentSearchResult> SearchRestaurants(ISearchIndexClient indexClient) {
      List resultsList = new List();

      var parameters = new SearchParameters();
      parameters.Filter = "rating gt 1";

      parameters.QueryType = QueryType.Full;
      parameters.SearchMode = SearchMode.All;
      parameters.IncludeTotalResultCount = true;
      parameters.Top = 10;

      string azureSearch = $"(name:food^2) || (name:restaurant)";

      try {
          var docResults = await indexClient.Documents.SearchAsync(azureSearch, parameters);
          return docResults;
      }
      catch (Exception e) {
      }
      return null;
  }
You will see the following results will be returned after running:
Searching...

  Number of results: 3

  Score: 0.30778623
  Name: Italian food
  Rating: 4.8
  WorkingHoursStart: 10
  WorkingHoursEnd: 23
  PhoneNumber: 1-800-477-4777
  ------------------------
  Score: 0.30778623
  Name: Chinese food
  Rating: 4.9
  WorkingHoursStart: 7
  WorkingHoursEnd: 23
  PhoneNumber: 1-800-480-4800
  ------------------------
  Score: 0.07599751
  Name: Best restaurant
  Rating: 2.7
  WorkingHoursStart: 8
  WorkingHoursEnd: 22
  PhoneNumber: 1-800-437-4370
  ------------------------
  Complete. Press any key to end application...
As you can see the documents, that have the boosted term “food” are on the top of results. If you remove the term boost, the azureSearch variable will look like this:
string azureSearch = $"(name:food) || (name:restaurant)";
You will see other results, where all three documents are ranged in another order:
Searching...

  Number of results: 3

  Score: 0.35786763
  Name: Best restaurant
  Rating: 2.7
  WorkingHoursStart: 8
  WorkingHoursEnd: 22
  PhoneNumber: 1-800-437-4370
  ------------------------
  Score: 0.18116833
  Name: Italian food
  Rating: 4.8
  WorkingHoursStart: 10
  WorkingHoursEnd: 23
  PhoneNumber: 1-800-477-4777
  ------------------------
  Score: 0.18116833
  Name: Chinese food
  Rating: 4.9
  WorkingHoursStart: 7
  WorkingHoursEnd: 23
  PhoneNumber: 1-800-480-4800
  ------------------------
  Complete. Press any key to end application...
Term boost can be useful when you want to implement a search, within which the user will be able to enter a few separated words and the order of these words will show the relevance of each word. For example, if the user on the site of cinema enters “horror, thriller, drama” in the search box, with term boosting on the top of the results there will appear horror movies, then thrillers, and then dramas.
And That’s Not Even a Half…
In this article, we reviewed on practice a couple of the most common usages of Azure Search. The provided functionality is much wider and, we hope, that while reading, you understood the basic principles of use and got inspired for further studies.
About Redwerk
Our company specializes in customized software development for such industries as E-commerce, Business Automation, E-health, Media & Entertainment, E-government, Game Development, Startups & Innovation. One of the technologies we use and provide to businesses is the Azure application development. Our dedicated development team has already delivered dozens of successful solutions via Azure technology. Reveal the power of SaaS platforms with us.